Documentation Fundamentals Rates Tiered by Delivery Area
Shipping Prices Tiered by Delivery Area
Often our merchants come to us both with a list of areas they ship to and a list of shipping tiers they provide. While it is possible to represent these as a long list of shipping prices, those are better for when you have several different products whose costs must be uniquely calculated.
This guide will walk you through how to design and implement rate cards, or shipping tiers separated by distinct delivery areas.
Getting Started
The first decision you need to make is how your shipping tiers are defined. They can be:
- Weight based - for each area you will build a list of weight ranges and how much to charge for them
- Price based - for each area you will build a list of price ranges and how much to charge for them
- Item based - for each area you will build a list of quantity ranges and how much to charge for them
Next, you want to decide how you are going to define your shipping areas. You can currently build areas that match along the following criteria:
- Zip / Postal Code is (Postal Code is X0A 0W0)
- Zip / Postal Code starts with (Postal Code starts with X0A)
- City is (City is Charlton Depot)
- City starts with (City starts with Charlton)
- UK Postcode Area is (UK Postcode Area is SW)
- UK Outward Code is (UK Outward Code is SW1A)
If you want to include multiple shipping areas in the same tier, you can! Simply enter them as a comma-separated list.
Step-by-step
Alright. At this point you have a good idea of what your shipping areas will be and how shipping prices within that area are defined. Let’s dive in!
- Take care of all the normal rate building steps like adding a name and description, then scroll down to prices
- Whether you edit the default price or are adding a price to your existing rules:
- Change the Applies To radio button on this price from ( ) Flat Rate to (x) Products
- (Optional) Click Add restriction if you want this tiered delivery area to apply to a set of products instead of the entire cart
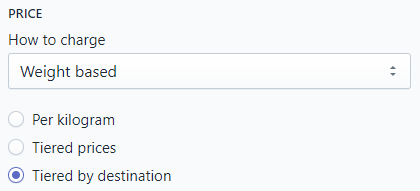
- Under Price: How to charge, select the option you decided on earlier for how each tier should be defined (Weight, Price, or Item based)
- A new set of radio buttons will appear. Select (x) Tiered by destination
- Under Destinations, let us know how your shipping areas are best defined
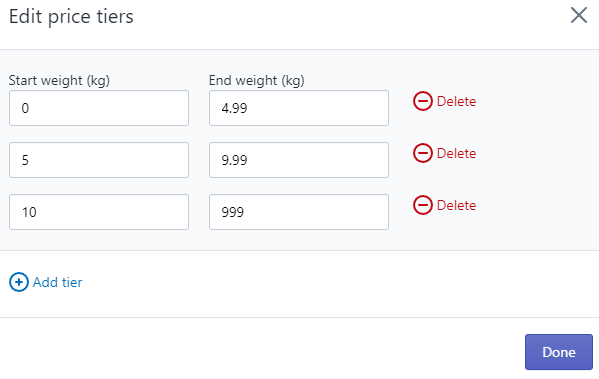
- On the right-hand side, click Edit Ranges
- A dialog will pop up prompting you to edit price tiers. Add as many start and end values as you need to cover all the prices you want to charge. To add another row click (+) Add tier
- When all of your ranges are entered, click [Done] on this dialog
Everything is prepared. Let’s begin entering your areas and shipping prices! - Click the ✏️ icon next to the default tier. We’re going to overwrite it
- Enter your shipping area. This can be a single entry or several as a comma-separated list
- Enter a price for each of the tiers you defined earlier
- Important: Click the Done button next to the circular checkmark.
Do not click the blue/purple [Done] button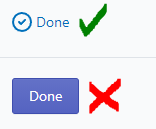
- Enter your next shipping area and prices
- Click (+) Add row
- Repeat the last two steps for as many shipping areas as you wish to define
- After your last area and set of prices is entered, click the [Done] button
- Finally, scroll to the top of the page and [Save] this rate
That’s it! Even though this setup is a little more involved than your typical price, you can define many areas and price ranges all from this one dialog.
Example
Say you’re running a fishing and hiking shop local to Montreal, Quebec. Your shipping rates and prices for the rest of the country are set, but you want to provided a shipping tier for every major area of your province. Your products ship by weight in the following order:
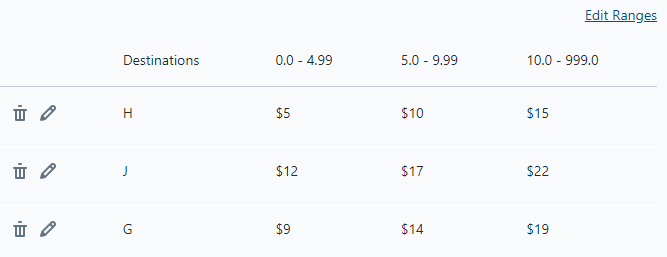
City of Montreal:
- 0kg up to 5kg is $5
- 5kg up to 10kg is $10
- 10kg and over is $15
Northwest Quebec:
- 0kg up to 5kg is $12
- 5kg up to 10kg is $17
- 10kg and over is $22
Northeast Quebec:
- 0kg up to 5kg is $9
- 5kg up to 10kg is $14
- 10kg and over is $19
At the same time, you know the postal code prefix for Quebec will either be:
- H for the city of Montreal
- J for the Western and Northern areas of the province
- G for the North-East side of the province
You have your weight ranges, your prices, and a set of areas that can be defined by selecting Postcode Starts With. Time to put it all together!
First you enter your shipping name, Quebec Shipping, and the description, “1-2 Business Days / Jours Ouvrables”.
You scroll down to the default price and click (x) Products so you can see more options.
You know your shipping prices are going to based on the weight of the order, so under Price: How to charge you select Weight Based.
Next, you click (x) Tiered by destination. So far, so good.
Under Destinations you select Zip / Postal Code starts with so you can use the postal code prefixes you had in mind earlier.
Now it’s time to enter your weight ranges. You click Edit Ranges and enter the lines:
- Start weight 0, End weight 4.99
- (+) Add tier
- Start weight 5, End weight 9.99
- (+) Add tier
- Start weight 10, End weight 999
Then click [Done] to finish up your weight tiers.
Moving along per the instructions above, you would ✏️ edit the default rate, clearing out the initial asterisk and entering H for your first area. Your weight tiers are listed as text boxes beneath the Destination, so you enter the prices 5, 10, and 15 in order.
Being careful to select the correct (✔) Done button, you proceed. A new set of blank text boxes is appears for you to fill out.
The next area is J so you enter it into the destination field, followed by your prices: 12, 17, 22. You still have one to go so you click (+) Add row
This is it. Your last area is G so you put it in the Destination text box, followed by the prices 9, 14, 19. Click (+) Add row one more time.
After that you check everything over to make sure it looks right:
Finally, you click the blue [Done] button to commit this shipping price and [Save] at the top of the page to save this rate. You’re all set!