Documentation Use Cases Alex’s Auto Parts
Use Case 3: Alex’s Auto Parts 🚗
Grime under your fingernails, sweat on your brow, and grease on your work overalls: you were born with a wrench in hand. Growing up under the scorching desert sun and sleeping beneath the breathtaking Arizona night sky, you always dreamed of starting your own auto repair and restoration shop. After earning your mechanical engineering degree, you worked at various auto shops and took on odd jobs to make it happen. Things have been going well locally for a few years, but now you’d like to offer vintage stock parts from your teardowns to other garages and hobbyists around the country.
What you will learn in this case study
- How to interpret a rate chart and approximate shipping areas in Parcelify
- How to work with linear prices, specifically price-per-weight
- How to approach imperial to metric unit conversions in your shipping rates
Store specifics
For most of your parts the default carriers built into Shopify work just fine. You’ve chosen one that can handle most of your heavy products, but run into trouble for products over 150 lbs (68 kg). They won’t ship with the standard built-in Shopify carrier rates!
The good news is, you don’t need to build a whole shipping rate strategy from the ground up. Some of your big ticket items are the heaviest however, so you do need a way to ship the heavy stuff one way or another.
Creating a strategy
Not to worry. You know your way around a part tolerance manual, so how much harder could a shipping rate manual be? You look up freight rates for your provider and come across the following chart:
2 Day Freight
Per-pound rates (multiply by total shipment weight)
.------------.---------.-----------.-----------.------------.-------------.---------------.----------.
|   weight   | Zone 2  |  Zone 3   |  Zone 4   |   Zone 5   |   Zone 6    |    Zone 7     |  Zone 8  |
:------------+---------+-----------+-----------+------------+-------------+---------------+----------:
| .          | 0-150mi | 151-300mi | 301-600mi | 601-1000mi | 1001-1400mi | 1401mi-1800mi | 1801+ mi |
:------------+---------+-----------+-----------+------------+-------------+---------------+----------:
| 151-499lbs | $1.48   | $2.45     | $3.13     | $3.23      | $4.83       | $6.63         | $7.80    |
'------------'---------'-----------'-----------'------------'-------------'---------------'----------'
That’s a fine start, but all of these shipping zones are relative to where you’re shipping from. Not to be deterred, you crack open your favorite mapping tool and build a list of what states are encompassed by these zones.
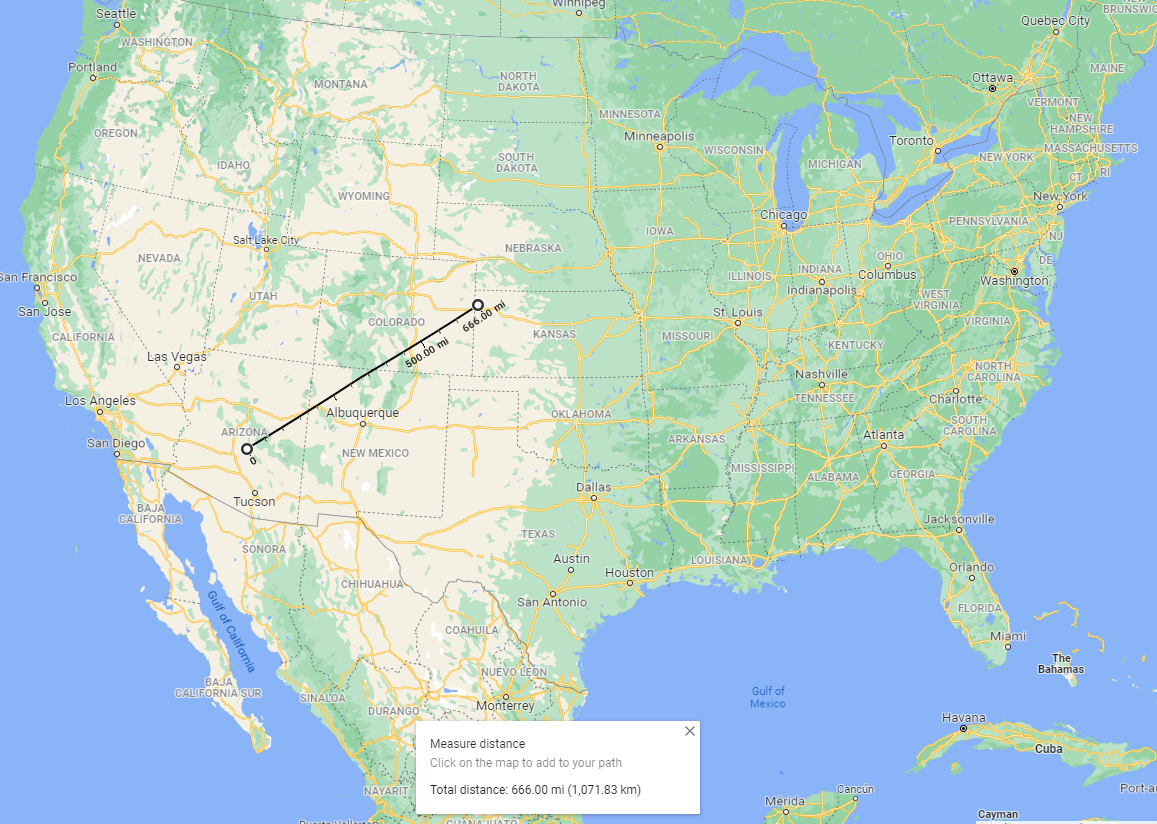
Map data © 2021 Google, INEGI
Here’s the list you come up with:
Zone 2 (0 to 150 miles): Unfortunately, you realize this zone doesn’t even cover your whole state. The edges of your home state go out to at least 230mi from the center. (If you did want to provide for this zone you would need to break it down by postcode, which is beyond the scope of this tutorial. See Additional information for more details)
Zone 3 (151 to 300 miles): All of Arizona
Zone 4 (301 to 600 miles): Utah and New Mexico
Zone 5 (601 to 1,000 miles): California, Nevada, Colorado, Wyoming, Nebraska, Kansas, and Oklahoma
Zone 6 (1,001 to 1,400 miles): Oregon, Washington, Idaho, Montana, North Dakota, South Dakota, Iowa, Missouri, Arkansas, Mississippi, Louisiana, and Texas
Zone 7 (1,401 to 1,800 miles): Minnesota, Wisconsin, Michigan, Illinois, Indiana, Ohio, Kentucky, Tennessee, Georgia, and Alabama
Zone 8 (1,801 or more miles): All the rest
Now you have all the pieces you need to get going. You ship from your shop, you ship to the zones listed, your shipping service is 2 Day Freight and charges a certain price-per-pound for each zone.
The only thing left to do is build it in Parcelify.
Adding your first shipping zone
On the main Parcelify page you add your shop to the list of locations (You only have to do this once).
Next, click [Add Shipping Zone].
You may want to add other services from this carrier later on, so you decide to adopt their language. You name the zone Zone 3, then click [Add Countries].
A Shipping destinations dialog appears. You either search or scroll to where it says United States, then click the link on the right that says 0 of 62 Regions.

Zone 3 corresponds to your home state of Arizona. Look at that. Arizona is right towards the top. You select the checkbox next to it and then click [Done].
Finally, back on the New shipping zone screen, you click [Save] to add this zone.
Designing your shipping rate
Now it’s time to implement your 2 Day Freight rate for Zone 3. On the Zones page, you click [Add shipping rates].
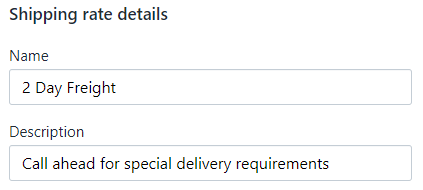
At the top our app will list your current location and shipping zone. Underneath that is your Shipping rate details. Along with the shipping price, this is what your customers will actually see at checkout.
You give it the name: 2 Day Freight
.. and the description: Call ahead for special delivery requirements
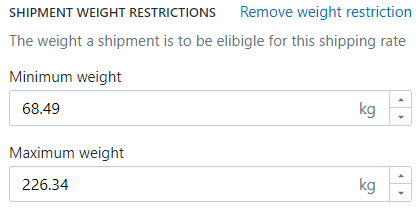
Next is shipment rate restrictions. Parcelify will quite happily calculate weight-based prices for any size order, so next to Shipment Weight Restrictions you click Add weight restriction.
Kilograms, huh? You don’t like it, but you convert your 151 lbs to 499 lbs restriction into 68.49 kg to 226.34 kg respectively and enter these values into the minimum and maximum weight fields.
Price per-weight
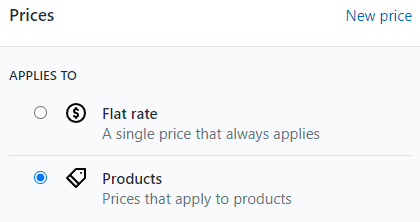
You scroll down to the bottom of your new rate and see our default Flat Rate $0 price. Since you want to charge shipping based on the total weight of your products, you change this price from ( ) Flat rate to (x) Products.
After that, you scroll down to where it says Price: How to charge. You use the dropdown to change how this price is calculated from Flat Rate to Weight based.
The default selection underneath is ‘Per kilogram,’ so you’ll have to make do.
At the bottom there’s a textbox for you to enter what amount should be charged per kilogram. You look up that a kilogram is about 2.205 times larger than a pound, so your $1.48 price will need to be equally embiggened.
$1.48 x 2.205 is $3.26, so you enter 3.26 into the textbox.
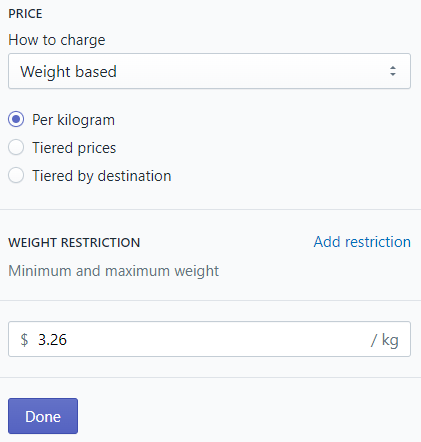
Satisfied with your arithmetic, you click [Done] to commit this price, then scroll to the top of the rate to [Save] this rate.
Adding your remaining shipping zones
The remainder of your shipping zones will follow a similar pattern. Click back until you are on the Zones page and click Add Shipping Zone.
Add the name of your next Zone, then click Add Countries to include the states that belong to it.
Click [Save] to finish adding this new Zone.
Adding your remaining shipping rates
Next, click the [Add shipping rates].
Like before, you give this rate a name, description, and weight restriction. You also proceed to add the shipping price in a similar manner, only recalculating the weight based pricing according to your 2 Day Freight chart.
For example:
- Zone 4 will be $6.90 per kg
- Zone 5 will be $7.12 per kg
- Zone 6 will be $10.65 per kg
… and so on
Your rates at checkout
You got your shop added, your zones set up, and your new 2 Day Freight shipping service added added to each of them. Thinking you’ve spent enough time in the front getting this all set up, you head back to the garage to get some more work done while it’s still daylight.
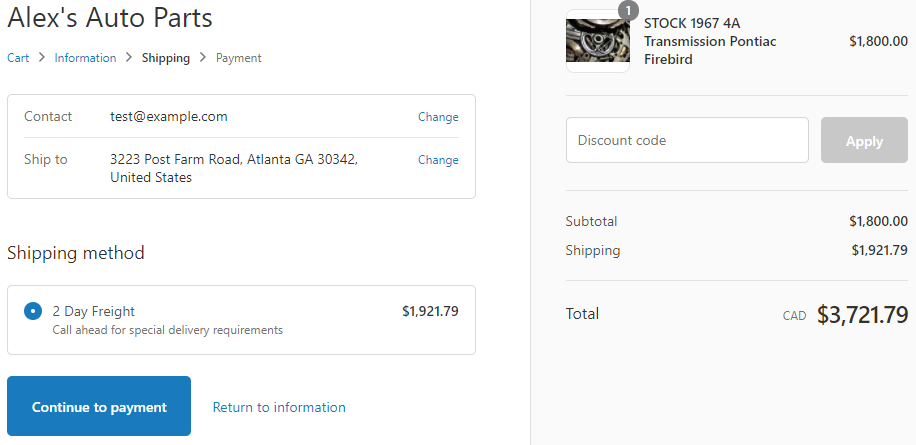
Later that evening, you check on your Shop from home to see if any of your heavy products have sold. As luck would have it, you have an order for a complete 1967 Pontiac Firebird 4-speed automatic transmission to a customer out in Atlanta, Georgia.
You have this part is listed at 290 pounds and you know from your chart it should get a shipping price appropriate for Zone 7.
290 lbs is 131.45kg. $6.63/lb is $14.62/kg. 131.45 * 14.62 comes out to about $1921.79 to ship. Not cheap, but hauling heavy metal across the country never is. More importantly, how did Parcelify handle this checkout?
Up to speed. 🏁
Additional information
This tutorial tries to balance brevity with the thoroughness required to describe a real life shipping scenario. Here is some extra information to adapt this tutorial to many of the possible shipping strategies you might find in the wild:
- In this example we simply exclude Zone 2 since it does not encompass the state of Arizona. You could instead build your Arizona zone with two shipping rates. One rate would be restricted to customers close to you, the other to customers further out in the state.
For more information, see our guide here: Destination specific shipping prices - Rounding is a necessary evil any time you deal with conversions. We’ve built Parcelify to accept grams and cents as the smallest meaningful denominations in our app since this is how Shopify handles weights and prices internally.
If you are building real-life shipping rates, you may wish to add an extra cent (or appropriate currency) after making conversions so that the shipping rate your customers receive is always more than what your fulfilment provider charges you - For shipping in the US, Hawaii and Alaska often have their own completely separate set of rules as shipments there must either cross water or country lines.
- Besides Hawaii and Alaska, the complete list of states in this example for Zone 8 (1801 or more miles) is as follows:
Connecticut, Washington DC, Delaware, Florida, Massachusetts, Maryland, Maine, North Carolina, New Hampshire, New Jersey, New York, Pennsylvania, Rhode Island, South Carolina, Virginia, Vermont, West Virginia